| Electric Motor Information |
Note on wiring of 3-phase motors. Please note that the pumps with frequency
drives also have 3-phase motors (even though the input to the freq drive is single
phase.
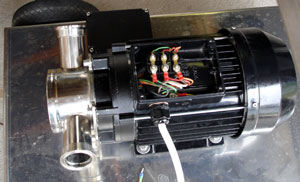
There are two means of terminating the windings in 3-phase motors
(Delta and Wye). 3-phase motors will operate with either but there is often a
preferred wiring for a particular application. The preferred wiring for all
of the pumps that we offer is shown in the photo above. Note there are 3
jumpers (flat copper connectors) positioned vertically. Each jumper connects
the outlet of each winding to its own input. [The alternative wiring is to tie
the 3 wires coming out of the motor together. In the photo above, the jumpers
would be positioned horizontally connecting the 3 posts at the top. There would
be no jumpers on the 3 lower posts (input wires).]
Virtually all of the Destemmer/Crushers and many of the pumps have simple induction motors. There are a small number of components in these motors and so it is relatively easy to diagnose a problem. Most problems can be fixed quickly.
Background.
The main components of the motors are
Rotor. This is what turns. It is virtually indestructible.
Windings. Copper wires that encircle the Rotor. There are two Windings in a single phase motor. There are 4 wires coming up from the single phase motor into the black box. These are the wires to the windings.
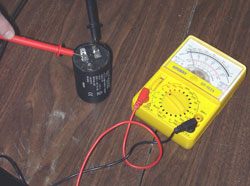
Run Capacitor. Typically about 30 MFD (microFarad). White in color. This is in series with one of the Windings. All of the single phase motors have a Run Capacitor. 3-phase motors do not have a Run Capacitor. How to Test a Capacitor
Start Capacitor. Typically about 100 MFD. Black in color. All of the 220 V, single phase motors on destemmer/crushers have a Start Capacitor. The Switch on these motors has a 0 and 1 (ON and OFF) as well as a position beyond 1 that has a spring return. To start the motor, you turn the switch all the way clockwise, the machine starts, and then you release the switch and it springs back to the 1 position. You are engaging the Start Capacitor only during the startup. The Start Capacitor provides a lot of current (and power) momentarily. Please note that the current draw may be as much as 3 times the FLA (full load amps) during startup. Some pumps such as Euro 30 single speed, do not have a Start Capacitor. Some 3-phase motors do not and some do. How to Test a Capacitor
Switch. There are several different switches depending if the motor has a Start Capacitor and is reversible (as in pumps).
Before working on any motor
First ensure that you have power at the outlet and at the motor. Always
unplug the power before removing any components.
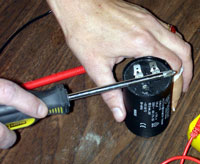
Note on handling Capacitors. Capacitors store energy and you can get a little jolt if you are not careful. (the run capacitors store less energy than the start capacitor) It is simple to remove the charge in a capacitor. Simple use an insultated wire or screwdriver with plastic handle and short the two leads of the capacitor. Again, be sure the motor is unplugged before working on any component. [Please note that this procedure is fine for the motors and capacitors used in these motors. However, do not apply the same technique to equipment with large capacitors. In such cases you should use a wire with a resistor and ground each post of a large capacitor.]
The motor will stop working when
1. Run Capacitor burns out. If the motor does nothing (and you are sure power is getting to the motor), then the Run Capacitor may be blown. Run capacitors cost about $5 and can be replaced in a few minutes. Again, these are white and are about 30 microFarad.
2. Start Capacitor burns out. This will often be easily visible. The black casing of the capacitor may be cracked or the capacitor looks deformed (bulging on a side). The motor may run but have difficulty starting (hums). Start Capacitors cost about $25 and are easily replaced.
3. Bad switch. This is easy to check if you have a voltmeter. It is a rather uncommon problem. Be very careful when removing a switch--especially motors with Start Capacitors--because there are small parts including springs that can be lost.
4. A winding burns up. This will almost always have a strong burnt smell. (Remove the capacitors first to be sure the smell is not from one of them.) This is far and away the most serious problem. Fortunately, it is far and away the least common. You must either have the motor rewound at an electrical motor repair shop or replace the motor. In many cases, the cost is about the same.
Euro 30 pump, single speed, has both a run and start capacitor. It is also reversible. So it has a switch that turns both left and right and has spring loaded positions in both directions to engage the start capacitor.
Jolly 20, 30, 50 and ENO 20 destemmer and destemmer/crushers have run and start capacitors and therefore a switch with spring-loaded position to engage the start capacitor. They are not reversible motors so the switch turns only clockwise.
ENO-3M and ENO-15 and ENO-10 have 110 V motors. They do not have a start capacitor and have a simple on/off switch.